PySpark environment for the Postgres database
In this blog, I am going to
- Create Postgres 13.4 docker environment
- Create Spark enabled Jupyter docker environment
- Run remote Jupyter notebooks via Visual Studio Code
- And test the PySpark Jupyter notebook1 or follow the PySpark Dataframe DSL basics which is the second part of this blog.
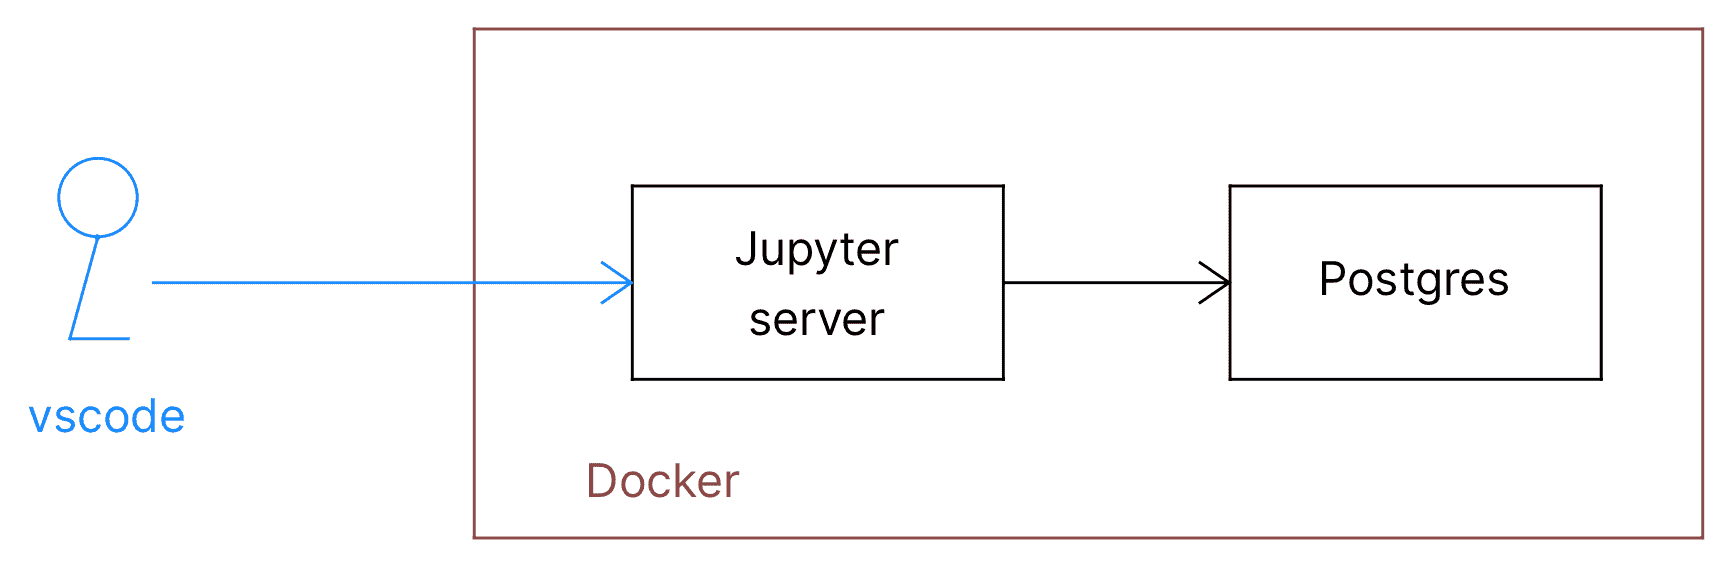
As shown in Fig.1, Jupyter Server and Postgres databases run in the Docker environment. Jupyter and Postgres Docker instances can communicate with each other.
You need to install and run docker before going further.
Setup Docker
To go through the rest of the installation, you should have setup Docker in your machine.
You can even use remotely installed docker machine either in another machine or a cloud (Glue Development using Jupyter2).
Setup Postgres
You have to create a folder where it is possible to create a data subfolder that holds all the database's contents.
docker run -t -i \
    --name Mastering-postgres \
    --rm \
    -p 5432:5432 \
    -e POSTGRES_PASSWORD=ojitha \
    -v "$(pwd)/data":/var/lib/postgresql/data \
    postgres:13.4
The Docker panel should show the container as follows:

Download the Postgres Sample Database3 as explained. Here is the DVD Rental ER Model:
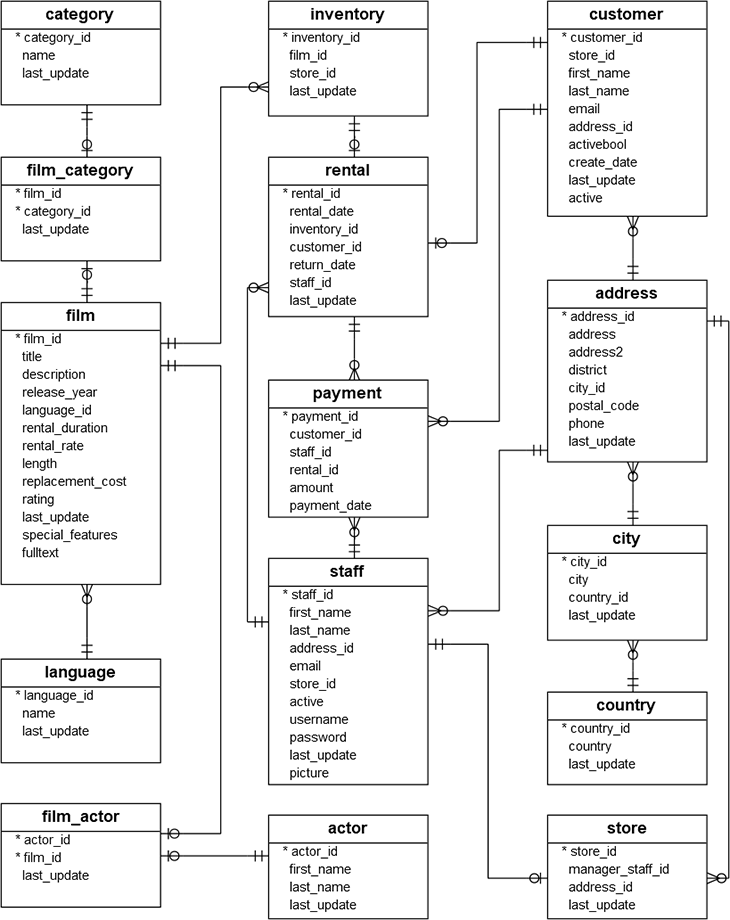
You can use PgAdmin4 to import the database. Please follow the Load PostgreSQL Sample Database5 instructions.
Setup Jupyter notebook with PySpark
Setting up the Postgres JDBC driver to access at /home/jovyan/work/extlibs/postgresql-9.4.1207.jar is necessary. The following bash command shows that the downloaded postgresql-9.4.1207.jar should be in the ./extlibs directory.
You can set up Jupyter notebook with PySpark as a docker container:
docker run --name pyspark -ti --link Mastering-postgres --rm -e JUPYTER_ENABLE_LAB=yes -e JUPYTER_TOKEN="pyspark" -v "$(pwd)":/home/jovyan/work -p 8888:8888 jupyter/pyspark-notebook:d4cbf2f80a2a

Use the Jupyter plugin with Visual Studio Code
First, you must install the Jupyter plugin6 for the VSCode. From the CMD+Shift+P, select the menu and type the Jupyter:
Now you can select from the existing Jupyter server next time:
As you see, you can find already-used sessions.
Jupyter cell magic
If you are working cell magic such as %%sql, you have to follow the following procedure:
- First install pg8000
!pip install pg8000 - Install the iPython cell magic for sql
!pip install ipython-sql - load the sql extension
%load_ext sql
Now you are ready to execute the queries
%%sql postgresql+pg8000://postgres:ojitha@Mastering-postgres:5432/dvdrental
SELECT * FROM public.actor LIMIT 10
First, you must connect to the database and then execute the select query in the second line. This will show you the result of 10 records from the actor table.
Appendix A: Connect to remote Docker machine
For example, I have installed OpenSSH server and Docker on a Windows 10 machine which is in my local area network. I created SSH private/public keys in my MacOS and copy the private key to Windows OpenSSH server and successfully connected via iTerm 2 macOS terminal.
Using the docker context ls command you can list the existing docker contexts. To add the new context in your macOS:
export TARGET_HOST=<ip address of the Windows 10>
docker context update ojwin --docker "host=ssh://$TARGET_HOST"
Above for update the existing ojwin context, use the create for new context instead update. To switch to new docker context:
docker context use ojwin
Now you are ready to create docker containers:
docker run -t -i \
    --name Mastering-postgres \
    --rm \
    -p 5432:5432 \
    -e POSTGRES_PASSWORD=ojitha \
    -v "C:\Users\ojitha\workspace\postgres\data":/var/lib/postgresql/data:rw \
    postgres:13.4
NOTE: You have to change the volume mapping. For example, from the above bash command to create Postgres container, you have to change the volume as
-v "C:\Users\ojitha\workspace\postgres\data":/var/lib/postgresql/data:rw. In the Windows environment, it is important to add the tailing:rwfor read write permissions.
To install the Python 3.10.4 based Jupyter container
docker run --name jupyter -ti --link Mastering-postgres --rm -e JUPYTER_ENABLE_LAB=yes -e JUPYTER_TOKEN="pyspark" -v "C:\Users\ojitha\workspace\jupyter":/home/jovyan/work:rw -p 8888:8888 jupyter/base-notebook:python-3.10.4
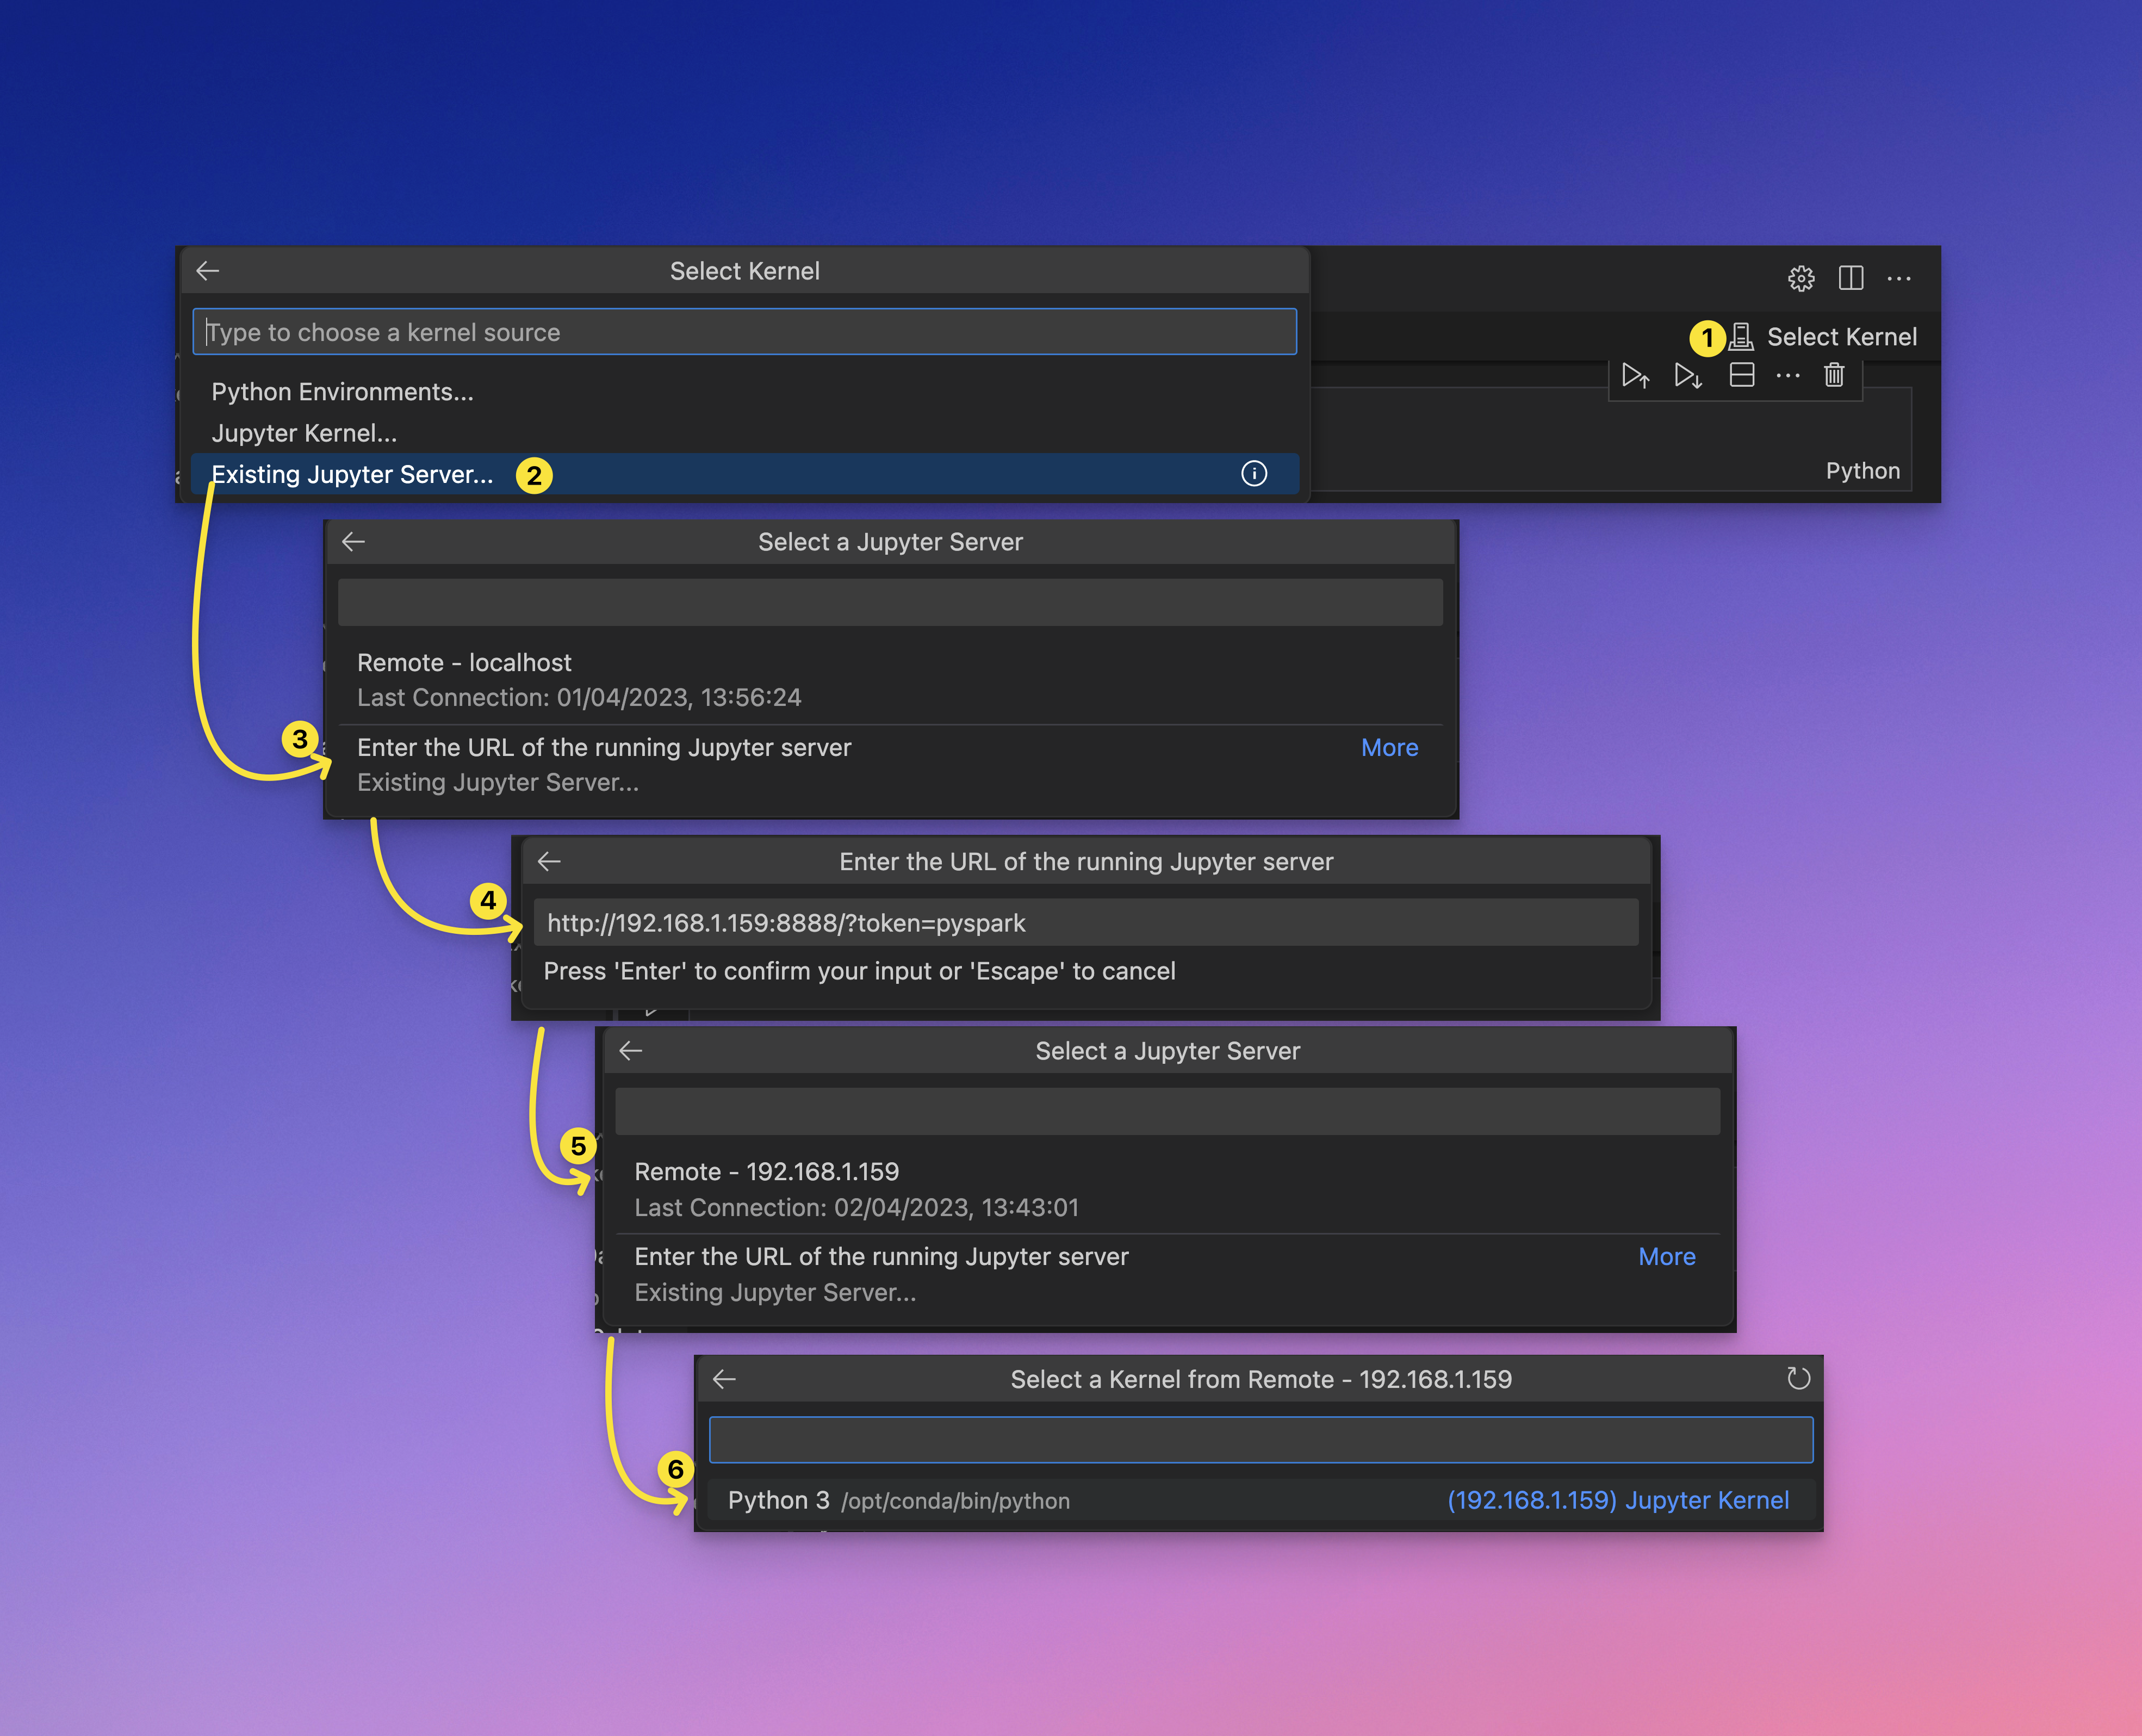
- Click kernel in the notebook
- You have a created Docker Jupyter server remotely
- You have to find the ip address of the remote server
- Enter the remote server URL
http://<remote ip>:8888/?token=pyspark(this is the token given when the Jupyter container was creatingJUPYTER_TOKEN="pyspark"in the docker run command). - Select the remote server as Jupyter server
- Select the runtime as Python
Appendix B: Jupyter notebooks on AWS Glue version 4
AWS Glue version 4 which has the Jupyter notebooks. I've used the Linux operating system ubuntu 20.x as my docker host in this case.
To start Postgres:
docker run -t -i --name Mastering-postgres --rm -p 5432:5432 -e POSTGRES_PASSWORD=ojitha -v "/home/ojitha/workspace/postgres/data":/var/lib/postgresql/data:rw postgres:13.4
To start the AWS Glue version which has the Jupyter notebooks.
docker run -it --link Mastering-postgres -v "/home/ojitha/workspace/glue":/home/glue_user/workspace/jupyter_workspace/ -e AWS_PROFILE=$PROFILE_NAME -e DISABLE_SSL=true --rm -p 4040:4040 -p 8888:8888 --name glue_pyspark amazon/aws-glue-libs:glue_libs_4.0.0_image_01
Above command will give you the Docker container bash prompt. To start the Jupyter notebook, you have to follow the 2 blog.
References


Comments
Post a Comment
commented your blog