Mac keyboard shortcut to copy file path as markdown
Get link
Facebook
X
Pinterest
Email
Other Apps
The macOS productivity1 shortcut to Copy file/folder markdown path.
How to create macOS Automator Quick Action to copy the file/folder markdown path using shortcut keys as the same way you copy the path name of the file/folder. I give you an idea of how to use JXA in the Automator. As additional information, I introduce how to use macOS Cocoa that will help you to make better logging using macOS Console application.
Almost all of my blogs are now written in Markdown format. And most of the productivity tools support the markdown format such as obsidian which is my knowledge management tool where I keep all my blog information before publishing. Therefore, I need to copy locally save files links to the Obsidian the second brain most of the time.
I have created macOS Quick Action service to copy any file or folder location in markdown format.
JXA support
JXA is the new replacement to the AppleScript. JXA is a JavaScript solution for which can be used in macOS script editor as well as Automator tool. For example, to open the last email message:
Mail = Application('Mail')
Mail.activate()

var lastMsg = Mail.inbox.messages[0]
Mail.open(lastMsg)
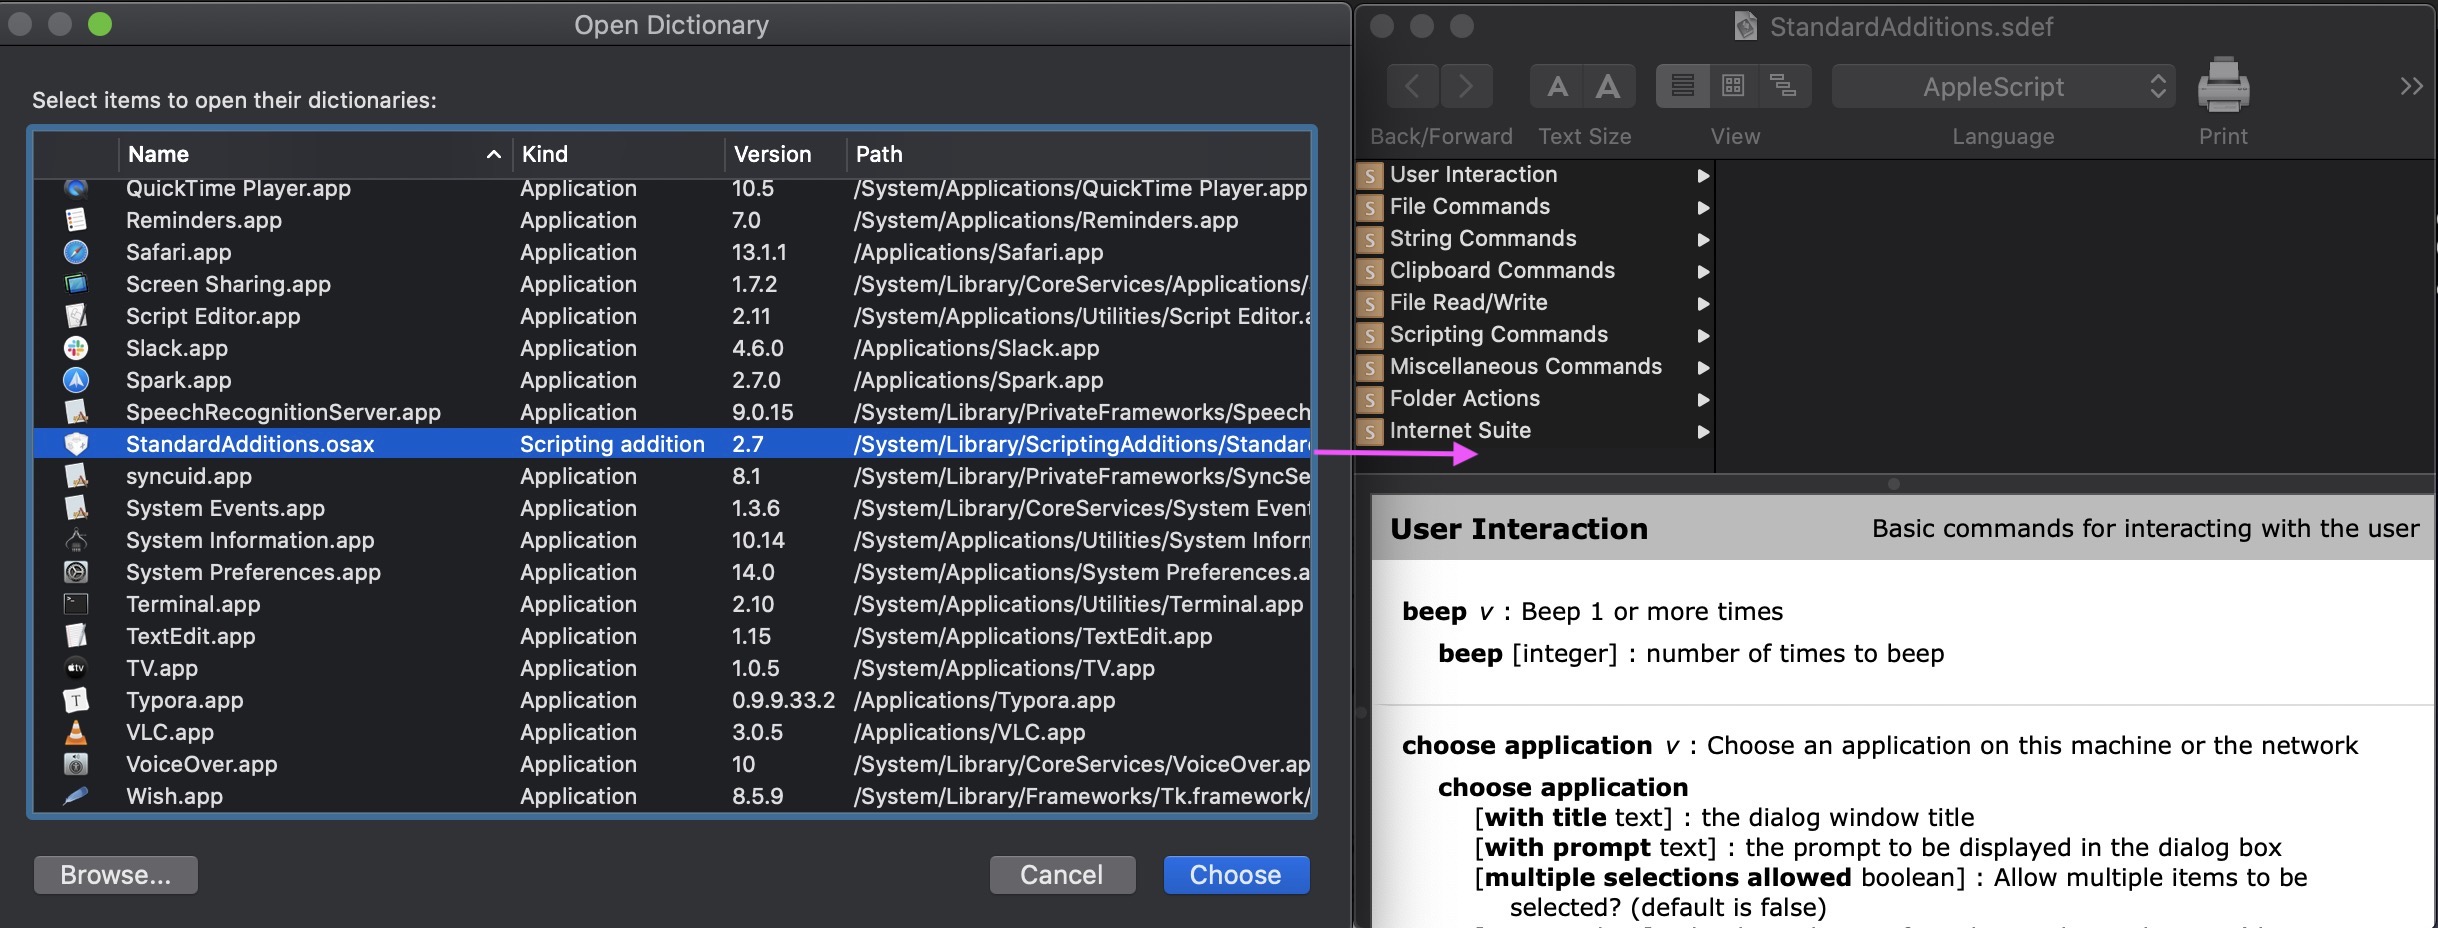
To use the StandardAddition.osax and its functionality as shown in the dictionary: Fig.1: Standard Additions
You have to create the following second line to use the say command.
If you are using Cocoa, then as shown in the linen #1 import the library. In the line #6 you can access the Cocoa API.
ObjC.import('Cocoa');
var app = Application.currentApplication();
app.includeStandardAdditions = true;

// access the Cocoa API
var nsDocumentsPath =$("~/Documents").stringByExpandingTildeInPath;

var myDocumentsPath = Path(nsDocumentsPath.js);
//debugger;
$.NSLog("My document folder is "+ myDocumentsPath.toString());
Logging support
You can find the NSLog output in the Console application.
var app = Application('Finder')
app.includeStandardAdditions = true
var clipStr = app.theClipboard();
debugger;
As shown in the line #4, if you have debugger keyword, that implies you can debug this in the Safari Develop tools. Before use, use you have to enable the develop tool in the Safari and tick the option:"Automatically Show Web Inspector for JSContexts" under your machine name in the Develop menu.
Create Quick Action
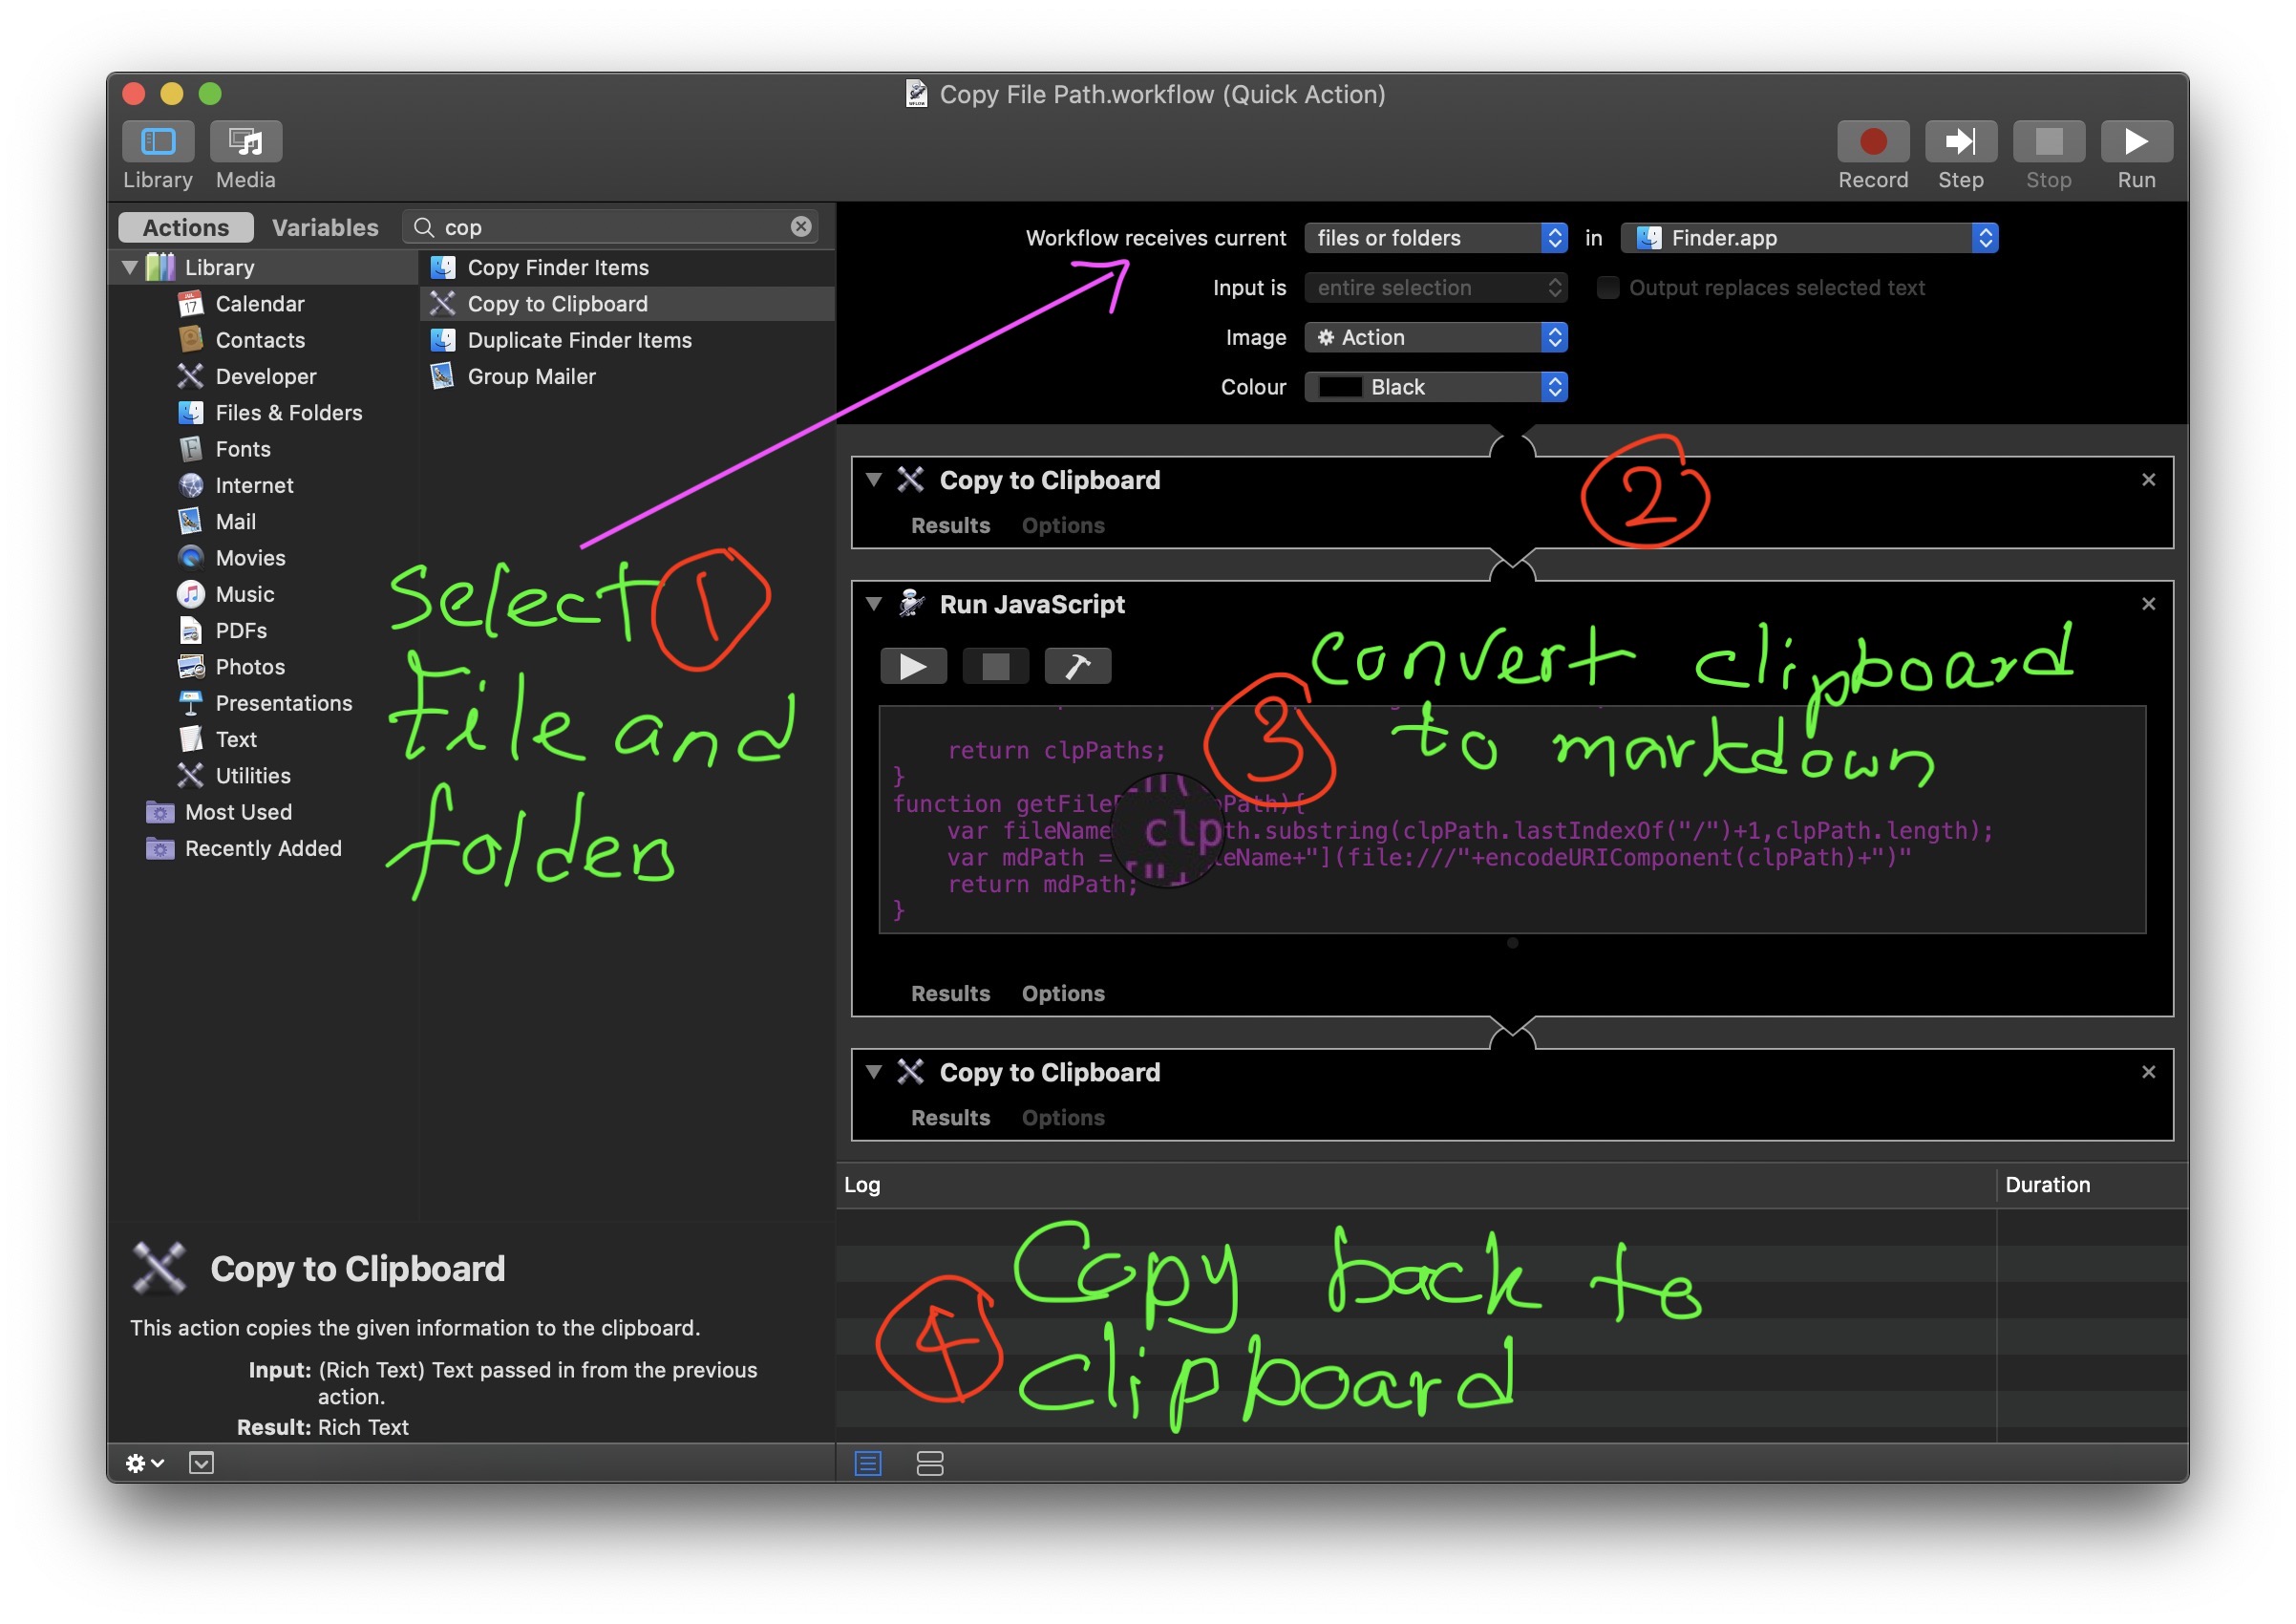
As shown in the following Fig.2 you can create Automator Quick Action. Fig.2: MacOS Automator
First and second steps are easy. The 3rd step is given here. Search "JavaScript" component and copy:
function run(input, parameters) {

    // Your script goes here
    //debugger;
    const clpPaths = input.map(x => getFilePath(x));

    return clpPaths;
}

function getFilePath(clpPath){
    var fileName = clpPath.substring(clpPath.lastIndexOf("/")+1,clpPath.length);
    var mdPath = "["+fileName+"](file:///"+encodeURIComponent(clpPath)+")"
    return mdPath;
}
The function run(input, parameters) should not change because that is what automator expecting to execute.
Testing using macOS Automator
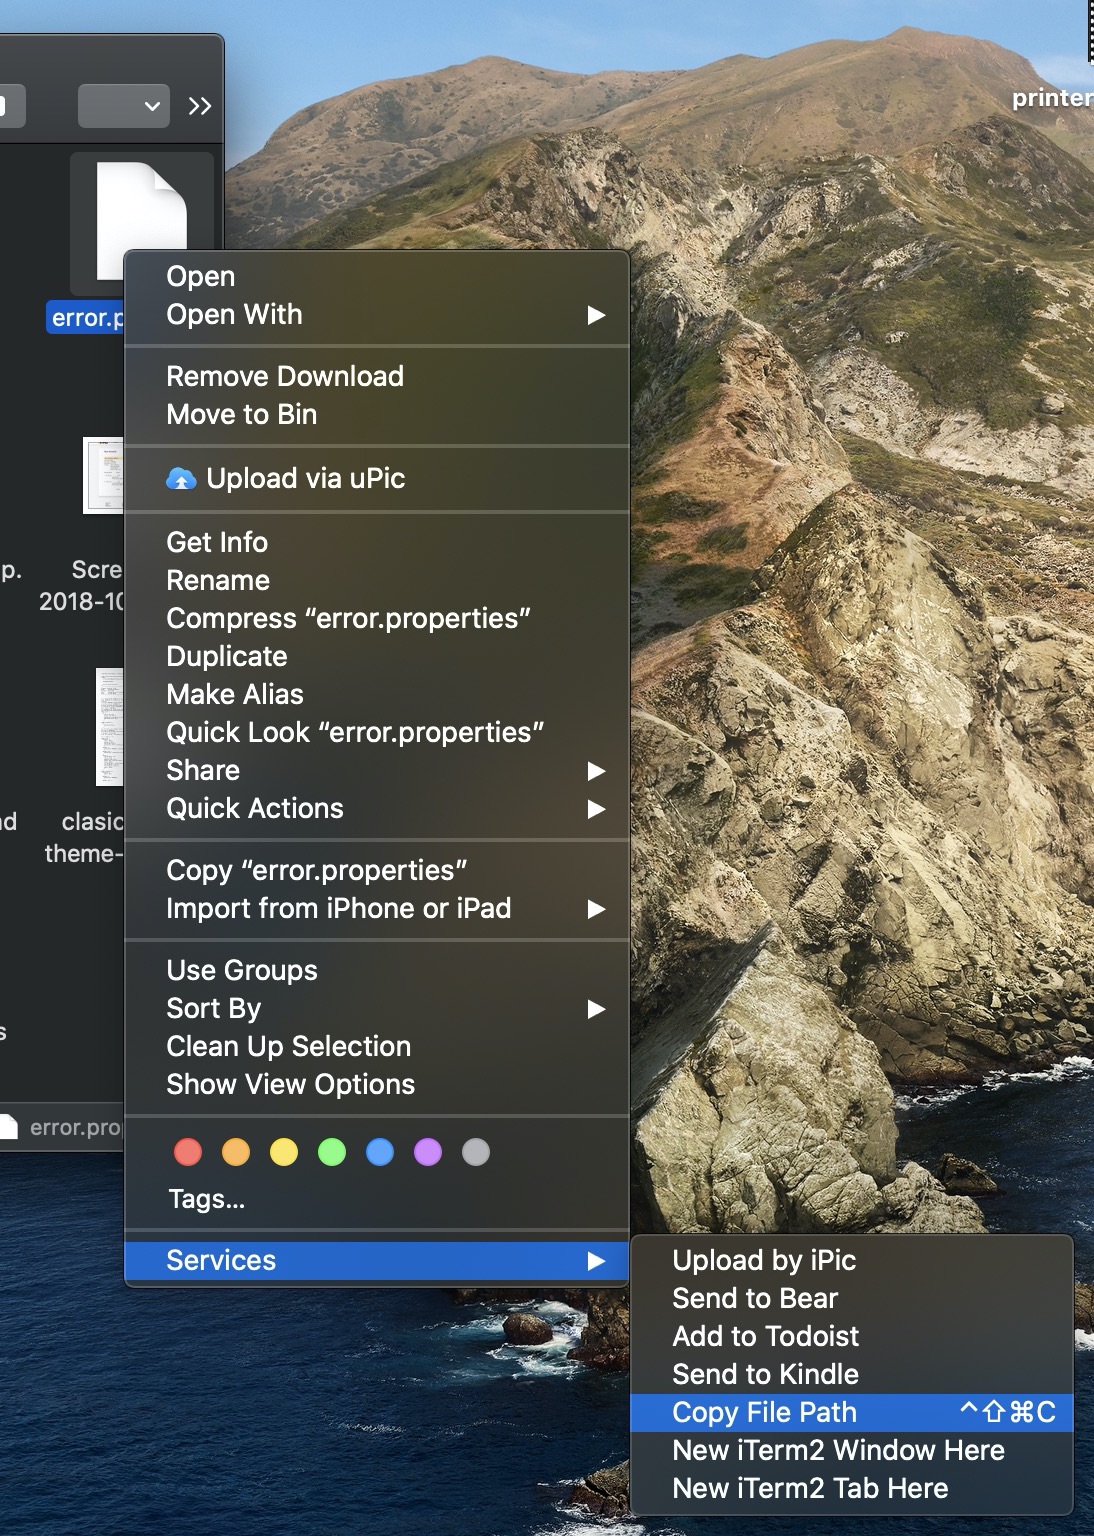
You can save the above as service and assign even shortcut3. As shown in the above line #4, you can debug(uncomment the line) this script while running as a service. Fig.3: Quick Action Shortcut in context menu
As shown in the Fig.3, In the Mac open the Finder and select one or more files. Now right click and select the Copy File Path or ^ ⬆︎ ⌥ ⌘ c which is the service (it has a shortcut to do the work without a context menu) and v to paste the clipboard contents to your markdown document. Hope this will be really productive. If you need name of the file only in the Finder, then select the fie and press ⌥ ⌘ c.
In this blog, I am considering how to parser and modify the xml file using python. For example, I need to parser the following xml 1 (slightly modified for this blog) and need to write the modified xml to out.xml file. Here the country.xml <?xml version="1.0"?> <actors xmlns:fictional="http://characters.example.com" xmlns="http://people.example.com"> <actor type='T1'> <name>John Cleese</name> <fictional:character>Lancelot</fictional:character> <fictional:character>Archie Leach</fictional:character> </actor> <actor type='T2'> <name>Eric Idle</name> <fictional:character>Sir Robin</fictional:character> <fictional:character>Gunther</fictional:character> <fictional:character>Commander Clement</fictional:character> </actor> </actors> In ...
I have used the workflow of Markdown blog writer for blogger for around two years. The main problem with this approach was the image manipulation. I have to separately upload the images to google photos. However later found the iPic image upload app which work with typora . But following two work flows are efficient as I found. Blog workflow this is how I create my new blogs. The basic tools are as follows: iPad Apple pencil MWeb app here the benifs of this workflow: I can work on same document both iPad and the mac computer Mweb support images and Malh for my documents In addion to that , Mweb publishes the web blog post to my Blogger site. The best is images are automatically upload to the google photos. Same post can be publish number of time, but Mweb keep track of images without duplicating. I use third party app sueh as Good Note 4 to create the diagram. For example following diagram was drawn from the DrawExpress App.  As shown in the above diagram, ...
CONTENTS Why new blog writer Workflow Typora StackEdit Math Support Complex Math Icons are well supported Flowcharts Image support Syntax Highlighter Conclusion Why new blog writer I was curious to find a new blog writher after some experiments with MarsEdit 2 and the Blogo 2. But both of those tools haven’t fulfil my requirements of having table of contents support latex type math support (latex is special for me because that is the most familiar) standard icons flowchart Tips and Notes which were not supported in my blog for years now. I was curious to have these new features in my blogger. Fortunately, I found a very good Markdown writers StackEdit and Typora . Workflow Here is my blog writing workflow: Created with Raphaël 2.1.2 Start document available ? publish ready ? StackEdit Save and Publish End Typora yes no yes no Typora This is so far the best desktop editor WYSIWYG editor found to create the document including Tabl...


Thank you, works perfectly.
ReplyDeleteLooks like a fellow Obsidian user needed the same thing as me :)
I didn't know about JXA that's awesome!