Posts

Remote Debugging Tomcat 6 using SSH tunnel

Image
My current IDE is Intellij Idea 12 and it is running on Windows 7 machine. However, server exist on one of the RedHat Enterprise machines. The main challenge is to debug the remote tomcat server via SSH port 22 only because that is the only allowed path. Even I cannot ping the server. Instead of catalina.sh, I have to always run the "sudo service tomcatx start|stop" because tomcat is installed as a service using redhat yum. From this blog I found the details to setup the tomcat. I changed the TOMCAT_HOME/conf/tomcat6.conf file to have the following JAVA_OPTS JAVA_OPTS="${JAVA_OPTS} -Xdebug -Xrunjdwp:transport=dt_socket,address=15005,server=y,suspend=n" This is just a one line. As shown in the above, the port is address that is 15005. Now I have to create the SSH connection using Putty as shown in the below source port: 15005 Destination:  localhost:15005 After add as shown in the above screenshot, you have to start the session.  Now yo...

JavaScript 1: history object

The top most object in the Browser Object Model (BOM) is the “window”. I have three files history.html:  Start file1.html: Middle file2.html: Last In the Start, you can click the “go to middle” to visit the page file1.html. In this page you have two buttons, when you click “Back” it should take you back to the history.html, otherwise you can go to the last page click by “go to end”. In the “End” page you can go to the page entering -2 for “Start” or –1 for “Middle”. <!DOCTYPE html> <html> <head> </head> <body> <h1>Start</h1> <a href="file1.html">go to middle</a> </body> </html> As shown in the above code, there is just one link to go to the middle page. <!DOCTYPE html> <html> <head> <title></title> </head> <body> <h1> In the Middle, one to go</h1> <a href="file2.html">go to end</a> <input type=...

Java EE 7 enterprise application development tutorial using Eclipse Kepler and GlassFish 4

Image
In this tutorial, I am going to use the latest technologies (to date) Eclipser Kepler GlassFish 4 as an Enterprise application server MySQL 5.6 JSF 2.2 Maven NOTE: The second blog of this is available in the JSF 2 Ajax . I am going to use archetypes to create EAR, EJB and WAR components. First, add the maven repository archetype catalogue http://repo1.maven.org/maven2/archetype-catalog.xml to the eclipse archetype selecting the Windows->Preferences and then Maven. Fig: 1 add maven archetype catalogue. The next step is crating a web project. As shown in the following fig 2, you can find webapp-javaee7. If you have little knowledge about maven, you can create new web application. Fig 2: select archetype to create WAR, EAR and EJB For example as shown in the following fig 3, you need to specify the Group Id, Artifact Id and Package. For both WAR and EJB project you will get the following error but it can be ignored. “Plugin execution not covered by lifecycle configur...

JSF 2.0 Ajax

Image
This is the second compilation of the tutorial Java EE 7 enterprise application development tutorial using Eclipse Kepler and GlassFish 4 . In this tutorial, I’ve enhanced the application to purely use the JSF 2 Ajax. As shown in the following diagram, I used Firebug to trace the Ajax request and response. As you see, jsf.js is the magic of JSF 2 Ajax. As shown in the above figure, when you add a new department, without refreshing the entire page, it updates the table under the “submit” button. Here the source for the facelet <!DOCTYPE html PUBLIC "-//W3C//DTD XHTML 1.0 Transitional//EN" "http://www.w3.org/TR/xhtml1/DTD/xhtml1-transitional.dtd"> < html xmlns = " http://www.w3.org/1999/xhtml " xmlns: ui = " http://java.sun.com/jsf/facelets " xmlns: h = " http://java.sun.com/jsf/html " xmlns: f = " http://java.sun.com/jsf/core " > < h: head > < title...

JAX-RS access via JSON using jQuery

Image
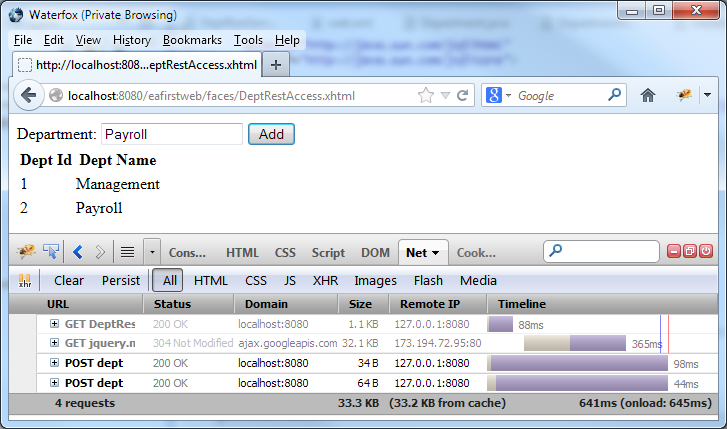
This is the continuation of the blog JSF 2.0 Ajax . In the blog JSF 2.0 Ajax , I’ve considered the Ajax access using JSF 2.0. In JSF, you always have to use the Managed bean. As I see managed bean is over-managed therefor more code needs to be added to avoid the undesirable side effects such as save twice. The REST approach is simple but not secure. <!DOCTYPE html PUBLIC "-//W3C//DTD XHTML 1.0 Transitional//EN" "http://www.w3.org/TR/xhtml1/DTD/xhtml1-transitional.dtd"> < html xmlns = " http://www.w3.org/1999/xhtml " xmlns: ui = " http://java.sun.com/jsf/facelets " xmlns: h = " http://java.sun.com/jsf/html " xmlns: f = " http://java.sun.com/jsf/core " > < h: head > < script src = " http://ajax.googleapis.com/ajax/libs/jquery/1.10.1/jquery.min.js " > </ script > </ h: head > < body > < form action = "...

JPA Part 3: Basic Relationships

Image
If you think in independent of source and target sides, one of the two sides will have the join column. That side is called the owning side or the owner of the relationship. The side that does not have the join column is called the non-owning or inverse side. If they are not there, the values default from the perspective of the attribute on the owning side. Physical annotations that define the mapping to the columns in the database are always defined on the owning side of the relationship. @ManyToOne mappings are always on the owning side of a relationship, so if there is a @JoinColumn, it should be found on the Many sides. @OneToMany is practically always bidirectional. Therefore, mappedBy must be specified, that is the inverse. Another side is @ManyToOne that is the owning side. @OneToOne, logically either side can be an owning sides. But you cannot avoid the ownership. Therefore, @mappedBy element is added to the inverse side (which is you decided) to indicate that the othe...